Poor Man's Arduino Line Follower
For a faster, smarter line follower checkout Arduino Line Follower Take Two
Over the weekend, me and a friend of mine, cannibalized a 9 Lira (6$) RC car into line a follower. Code in this post covers everything up to commit cf731aedc156f067aa221, refer to this particular commit for this project cause we plan on improving hence code will change.
Stuff you will need,
- 3x QTR-1RC Reflectance Sensor
- Ardumoto - Motor Driver Shield
- A cheap RC car
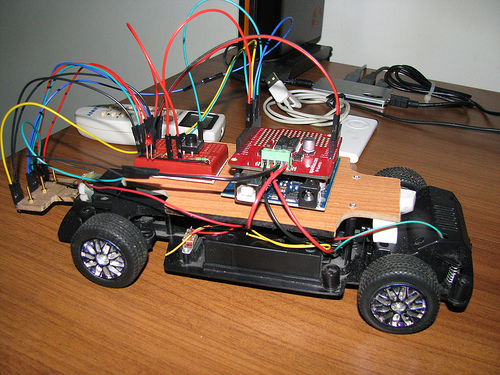
Hardware
Two sensors track the black area to the sides, one sensor tracks the white line in the middle. Each sensor has 3 pins on them, VIN GROUND and OUT. VIN and GROUND goes to +5V and GROUND, OUT goes to digital pin. For this project we used, digital pins 5 through 7.
- Sensor on the left is connected to digital pin 5
- Sensor in the middle is connected to digital pin 6
- Sensor on the right is connected to digital pin 7
An LED is connected to digital pin 8, and a push button is connected to digital pin 2, refer to the fritzing diagram for their wiring.
To control the DC motors on the RC car, we used an ardumoto shield which allows you to control up to 2 DC motors. It uses digital pins,
- 10 for PWM for MotorA
- 11 for PWM for MotorB
- 12 for Direction MotorA
- 13 for Direction MotorB
This particular car is setup such that the motor on the rear provides forward and backward motion depending on the direction of the motor, forward motor turns the wheels depending on the direction it is turning (e.g. when the direction pin is high wheels turn right).
Power supplied through a 9V 2Amp power adapter.
Software
Code is divided into 2 modules, engine and navigation. Engine module is responsible for movement it exposes five functions, straight, left, right, reverse and forward. Navigation module exposes 2 functions calibrate and steer.
 void engine::forward(int speed, int time){
   analogWrite(PwmPinMotorB, speed);
   digitalWrite(DirectionPinMotorB, LOW);

   delay(time);

   analogWrite(PwmPinMotorB, 0);
   digitalWrite(DirectionPinMotorB, LOW);
 }

 void engine::reverse(int speed, int time){
   analogWrite(PwmPinMotorB, speed);
   digitalWrite(DirectionPinMotorB, HIGH);

   delay(time);

   analogWrite(PwmPinMotorB, 0);
   digitalWrite(DirectionPinMotorB, HIGH);
 }
These functions can be used to move the robot forward and backward. They take a PWM value and a time in milliseconds,
engine.forward(255,10);
will turn the rear motor for 10 milliseconds at full power. Direction of the robot can be changed using,
 void engine::right(){
   analogWrite(PwmPinMotorA, 255);
   digitalWrite(DirectionPinMotorA, LOW);
 }

 void engine::left(){
   analogWrite(PwmPinMotorA, 255);
   digitalWrite(DirectionPinMotorA, HIGH);
 }

 void engine::straight(){
   analogWrite(PwmPinMotorA, 0);
   digitalWrite(DirectionPinMotorA, HIGH);
 }
These will change the direction of the forward motor causing the car to turn. Turning the motor forward will cause the front wheel to turn left, turning the motor backwards causes the wheels to turn right.
Navigation module begins, by calibrating itself,
 void navigation::calibrate(){
   unsigned int val[3];
   qtr.read(val);

   int right = val[0];
   int middle = val[1];
   int left = val[2];

   bwMean = ((right - middle) + (left - middle))/2;
 }
We read all three sensors and calculate the average of difference in black and white readings, which is stored in a variable called bwMean, it is used when calculating robots position relative to the line.
 void navigation::steer(){
   int bearing = getBearing();

   if(bearing == LEFT)
     engin.left();

   if(bearing == STRAIGHT)
     engin.straight();

   if(bearing == RIGHT)
     engin.right();

   engin.forward(255,10);
 }
We ask for a bearing then tell the engine to turn in that direction and move forward one step.
 int navigation::getBearing(){
   unsigned int val[3];
   qtr.read(val);

   int right = val[0];
   int middle = val[1];
   int left = val[2];

   if(left <= middle && left <= right && position != RIGHT){
     position = LEFT;
     return RIGHT;
   }

   if(right <= left && right <= middle && position != LEFT){
     position = RIGHT;
     return LEFT;
   }

   if(middle <= left && middle <= right && middle < bwMean){
     position = STRAIGHT;
     return STRAIGHT;
   }

   if (position == LEFT ) return RIGHT;
   if (position == RIGHT ) return LEFT;
 }
getBearing calculates our position relative to the line. We read all three sensors, basically the sensor which has the lowest value is on the white line. So we turn in the direction of the sensor with the lowest value, but there is a problem with this approach, when all sensors are on the black area, one of them will still read lower than the others which will cause the robot to turn in some random direction. To overcome this problem we introduce a new variable called position which records last position. Now we only turn right or left if we are not already in that side of the line, e.g. we don't want to turn left when we are already left of the line. This covers left and right turns however when all the sensors are on the black, middle one will still read lowest so we use the bwMean value we calculated and only go straight if the middle sensor reading is lower than the mean value we calculated. If we are left or right of the line we continue turning in that direction, until we find the line again.
In the main arduino loop we just call steer function over and over again,
 void loop(){
   navigation.steer();
   delay(70);
 }
When everything wired and code uploaded, it works like this,